

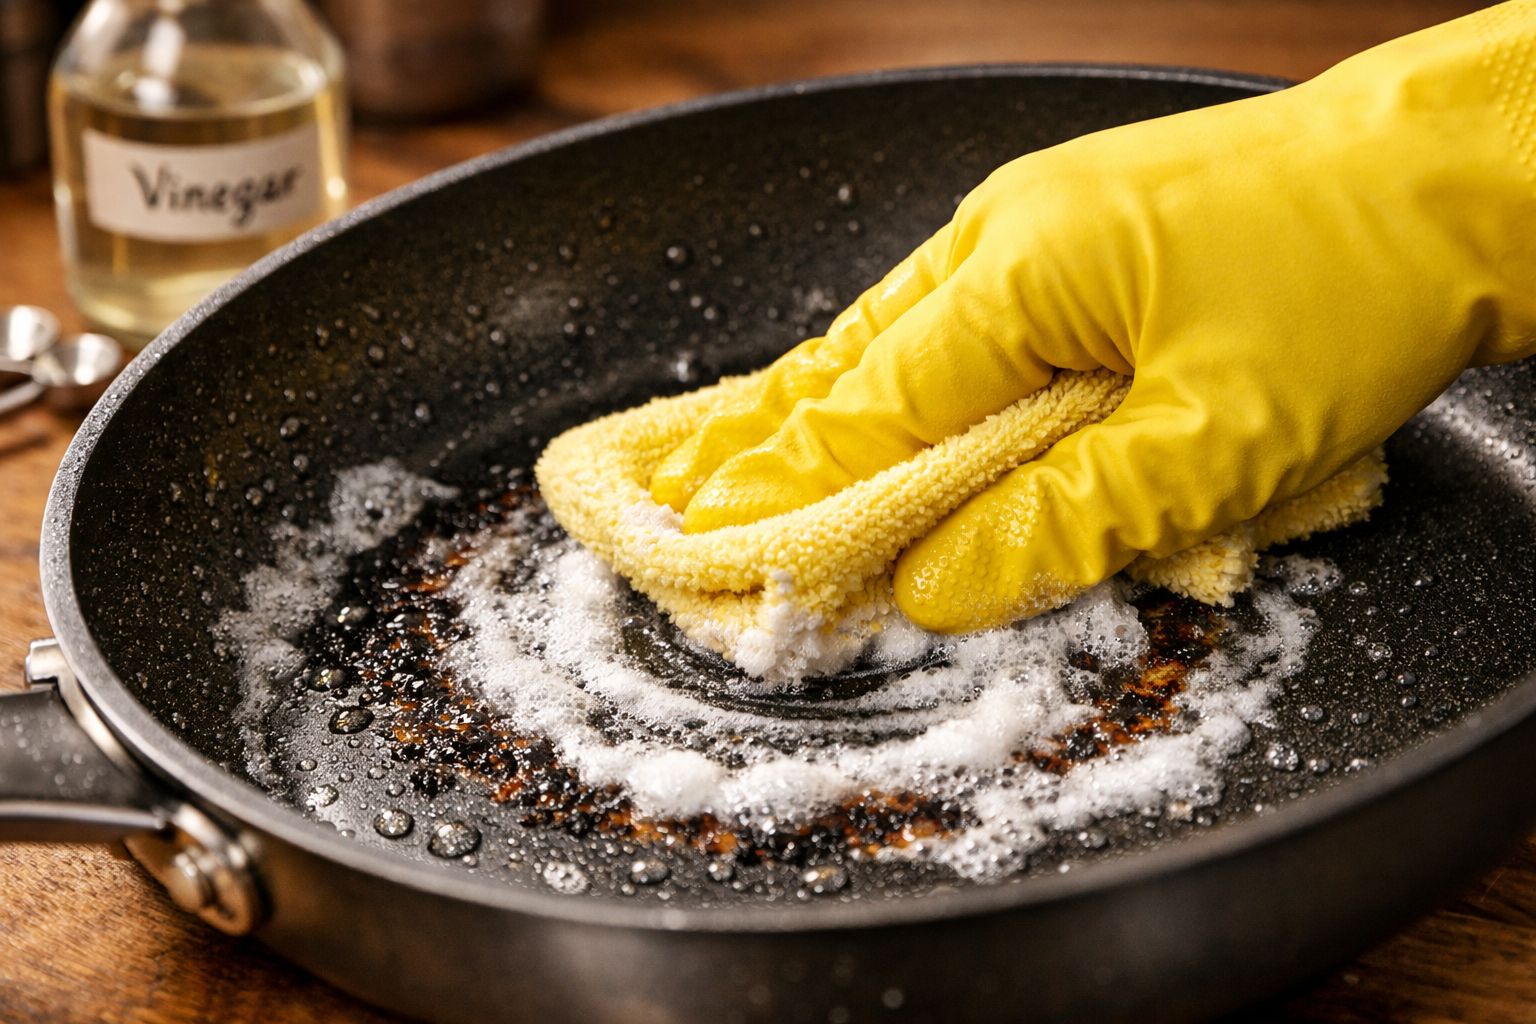
How to Clean a Burnt Non Stick Pan
Latest Update: March 6th 2026
I’ll never forget the sinking feeling when I glanced away from my stovetop for just two minutes to answer a phone call, only to return to a smoking pan with a thick layer of charred food stuck to my favorite non-stick skillet.
That moment of panic, wondering if I’d ruined an expensive piece of cookware, is something many home cooks experience. The good news? Learning How to Clean a Burnt Non Stick Pan doesn’t require professional equipment or harsh chemicals.
In 2026, with the right techniques and household ingredients, you can restore your cookware to near-perfect condition without damaging the delicate non-stick surface.
Whether you’re dealing with a minor cooking mishap or serious carbon buildup, this comprehensive guide will walk you through proven methods that professional chefs and cookware manufacturers recommend.
Before you consider tossing that burnt pan in the trash, let’s explore the science-backed cleaning strategies that can save your cookware and your budget.
Key Takeaways
- Never use abrasive materials like steel wool or harsh scrubbers on non-stick surfaces—they permanently damage the coating and reduce pan lifespan
- The vinegar and baking soda method (1:1 ratio boiled for 5-10 minutes) is the most effective solution for stubborn burnt residue on non-stick cookware
- Progressive cleaning approach works best: start with gentle dish soap soaking, then escalate to stronger methods only if needed
- Prevention through proper technique (medium-low heat, avoiding empty preheating, hand washing only) eliminates most burning incidents
- Cost savings are significant: properly cleaning and maintaining non-stick pans extends their life 2-3 years, saving $50-150 on replacements
Understanding What Causes Burnt Residue on Non-Stick Pans

Before diving into cleaning methods, it’s helpful to understand the chemistry behind burnt food.
When cooking oils and food particles are exposed to excessive heat, they undergo a process called carbonization.
The proteins, sugars, and fats in food break down and form carbon-based compounds that bond tightly to your pan’s surface.
The Science of Carbon Buildup 🔬
Non-stick coatings, whether traditional PTFE or modern ceramic—are designed to prevent food adhesion under normal cooking conditions. However, when temperatures exceed 400°F (204°C), even the best durable non-stick frying pan can develop burnt residue.
The carbonized material creates a rough texture that compromises the pan’s non-stick properties and can affect the flavor of future meals.
According to cookware manufacturers, the most common causes of burning include:
- Excessive heat: Non-stick pans require medium-low to medium heat for optimal performance
- Empty preheating: Heating an empty pan causes hot spots that burn food instantly upon contact
- Aerosol cooking sprays: These contain additives that carbonize at lower temperatures than pure oils
- Neglected food particles: Residue from previous cooking sessions can burn during subsequent use
Understanding these causes helps prevent future incidents, but when accidents happen, knowing how to clean a burnt non stick pan properly becomes essential for cookware preservation.
The Progressive Approach: How to Clean a Burnt Non Stick Pan Step-by-Step
Professional chefs and cookware experts recommend a progressive cleaning strategy that starts gentle and escalates only when necessary. This approach protects your pan’s coating while effectively removing burnt residue.
Method 1: The Foundation—Warm Soapy Water Soak
Best for: Light to moderate burns, fresh residue
This initial step should always be your first attempt, regardless of burn severity. The rehydration process makes subsequent cleaning significantly easier.
Step-by-step process:
- Allow the pan to cool completely (never shock a hot pan with cold water)
- Fill the pan with warm water until burnt areas are fully submerged
- Add 2-3 drops of gentle dish soap
- Let soak for 30-60 minutes, or overnight for stubborn burns
- Use a soft, non-abrasive sponge to gently wipe away loosened residue
- Rinse thoroughly with warm water and dry completely
Pro tip: For enhanced effectiveness, I often add a tablespoon of baking soda to the soaking water. This creates a mildly alkaline environment that helps break down acidic food compounds.
Method 2: The Powerhouse—Vinegar and Baking Soda Boil
Best for: Stubborn burns, heavy carbonization, multiple layers of residue
This combination is the most recommended heavy-duty method by cookware manufacturers and cleaning experts. The chemical reaction between acidic vinegar and alkaline baking soda creates effervescence that lifts burnt particles from the pan surface.
Step-by-step process:
- Mix equal parts white vinegar and water (typically 1 cup each for a standard 10-inch pan)
- Add 2 tablespoons of baking soda to the liquid (expect fizzing)
- Place the pan on the stovetop over medium heat
- Bring the mixture to a gentle boil
- Allow to simmer for 5-10 minutes while the solution works on burnt areas
- Remove from heat and let cool for 15 minutes
- Discard the liquid and use a soft sponge to wipe away loosened residue
- Wash with regular dish soap and water
- Rinse thoroughly to remove all baking soda residue (important for ceramic pans)
Why it works: The acetic acid in vinegar breaks down organic compounds, while baking soda provides gentle abrasion and neutralizes acidic residues. Together, they create a powerful yet pan-safe cleaning solution.
I’ve used this method countless times on my ceramic nonstick cookware set, and it consistently delivers impressive results without damaging the coating.
Method 3: The Spot Treatment—Baking Soda Paste
Best for: Localized burns, specific problem areas, gentle intervention
When you have isolated burnt spots rather than widespread damage, a targeted paste treatment offers effective cleaning without exposing the entire pan to intensive methods.
Step-by-step process:
- Mix 3 tablespoons of baking soda with just enough water to create a thick paste (consistency of toothpaste)
- Apply the paste directly to burnt areas using your fingers or a soft cloth
- Let sit for 15-30 minutes (longer for severe burns)
- Gently rub the paste in small circular motions with a soft sponge
- Rinse thoroughly with warm water
- Repeat if necessary for stubborn spots
- Wash the entire pan with dish soap and water
Environmental benefit: This method uses minimal water and no harsh chemicals, making it an eco-friendly option for those interested in sustainable cookware practices.
Method 4: The Gentle Alternative—Dish Soap and Simmer
Best for: Moderate burns, when you want to avoid vinegar smell, everyday maintenance
This straightforward method leverages heat and soap to loosen burnt food without introducing additional cleaning agents.
Step-by-step process:
- Fill the pan with enough water to cover all burnt areas
- Add 1-2 tablespoons of liquid dish soap
- Place on stovetop over medium heat
- Bring to a gentle simmer (not a rolling boil)
- Maintain simmer for 10-15 minutes
- Remove from heat and allow to cool slightly
- Use a soft sponge to wipe away softened residue
- Rinse and dry thoroughly
When I use this method: This is my go-to for pans with moderate burning that I need to use again quickly. The process is fast, effective, and doesn’t leave any lingering vinegar odor in the kitchen.
Alternative Methods: Creative Solutions for Burnt Non-Stick Pans
Beyond the standard approaches, several alternative methods have gained popularity among home cooks and cleaning enthusiasts. While not always necessary, these techniques offer chemical-free or specialized solutions.
Salt Scrubbing Method
Best for: Chemical-sensitive households, natural cleaning preferences
Salt provides gentle abrasion without the harsh scratching of steel wool. The crystalline structure helps lift carbonized particles while dissolving in moisture.
Process:
- Sprinkle 2-3 tablespoons of table salt into the cooled pan
- Add a few drops of water to create slight moisture
- Use a damp soft sponge to scrub in circular motions
- Focus on burnt areas with gentle pressure
- Rinse thoroughly and wash with dish soap
Important note: Use only fine table salt, not coarse sea salt or kosher salt, which can be too abrasive for delicate non-stick coatings.
Dishwasher Tablet Method
Best for: Protein-based burns, starch residue, enzyme-powered cleaning
Modern dishwasher tablets contain enzymatic cleaners specifically designed to break down food proteins and starches. This makes them surprisingly effective for burnt food removal.
Process:
- Wet the burnt area of the pan with warm water
- Rub a dishwasher tablet directly on burnt spots in small circles
- Allow the tablet to partially dissolve while scrubbing gently
- Let sit for 10-15 minutes
- Rinse thoroughly with warm water
- Wash normally with dish soap
Cost consideration: While effective, dishwasher tablets cost approximately $0.25-$0.50 per use, making this method more expensive than baking soda or vinegar solutions.
Lemon and Baking Soda Method
Best for: Light burns, fresh residue, natural cleaning with pleasant scent
The citric acid in lemon juice provides similar benefits to vinegar but with a more pleasant aroma.
Process:
- Sprinkle baking soda over burnt areas
- Cut a lemon in half and use it to scrub the baking soda into residue
- The citric acid reacts with baking soda while the lemon provides gentle scrubbing action
- Let sit for 15 minutes
- Rinse and wash normally
What to NEVER Do When Cleaning Burnt Non-Stick Pans
Understanding what to avoid is just as important as knowing proper cleaning techniques. These common mistakes can permanently damage your cookware:
❌ Abrasive Materials and Tools
Never use:
- Steel wool or wire brushes
- Chain mail scrubbers
- Scouring powders (Comet, Ajax, etc.)
- Heavy-duty scrubbing brushes with stiff bristles
- Metal spatulas or utensils for scraping
These materials create microscopic scratches that compromise the non-stick coating, reducing effectiveness and potentially releasing coating particles into food[1][4]. Once scratched, a non-stick pan’s performance degrades rapidly.
❌ Dishwasher Cleaning
Despite some manufacturers claiming “dishwasher-safe” status, hand washing is essential for non-stick pan longevity[5]. Dishwashers subject cookware to:
- Harsh detergents with alkaline compounds
- High-pressure water jets
- Extended exposure to high heat
- Collision with other items
These factors accelerate coating degradation. I learned this lesson the hard way when my first affordable nonstick pan lost its non-stick properties after just six dishwasher cycles.
❌ Thermal Shock
Never place a hot pan directly into cold water. The rapid temperature change can cause warping, especially in aluminum-core pans, and may crack ceramic coatings. Always allow pans to cool naturally before cleaning.
❌ Oven Cleaning Sprays
Commercial oven cleaners contain extremely caustic chemicals (sodium hydroxide) designed to dissolve baked-on grease in ovens. These products will destroy non-stick coatings in minutes. They’re formulated for bare metal surfaces, not delicate cookware coatings.
Prevention Strategies: How to Avoid Burnt Non-Stick Pans
The best cleaning method is prevention. By implementing proper cooking techniques and maintenance practices, you can dramatically reduce burning incidents.
Optimal Heat Management 🌡️
Temperature guidelines:
- Low heat: Warming, gentle simmering (1-3 on most stovetops)
- Medium-low heat: Most non-stick cooking, sautéing vegetables (3-4)
- Medium heat: Searing proteins, stir-frying (4-6)
- Never exceed medium heat for non-stick cookware
Modern ceramic nonstick cookware heats 30% faster than traditional non-stick, requiring even lower temperature settings[2]. What feels like “medium” heat on stainless steel may be “medium-high” for non-stick pans.
Proper Preheating Technique
The right way:
- Place pan on burner at desired temperature
- Add cooking fat (butter, oil) immediately
- Allow fat to heat for 30-60 seconds
- Add food when fat shimmers (oil) or foams (butter)
Never: Preheat an empty non-stick pan. Without food or fat to absorb heat, temperatures can spike to 500°F+ in minutes, causing permanent coating damage and potentially releasing fumes.
Cooking Fat Selection
Best choices:
- Butter (for low-medium heat cooking)
- Olive oil (medium heat, up to 375°F)
- Avocado oil (higher heat tolerance, up to 520°F)
- Coconut oil (medium heat, adds flavor)
Avoid: Aerosol cooking sprays contain lecithin and propellants that carbonize at lower temperatures than pure oils, creating sticky residue that’s difficult to remove. If you prefer spray application, use a refillable oil mister with pure oil.
Regular Maintenance Schedule
After each use:
- Wash by hand with soft sponge and mild dish soap
- Dry completely before storing
- Check for any residue buildup
Monthly:
- Inspect coating for scratches or wear
- Deep clean with baking soda paste even if no visible burns
- Apply thin layer of cooking oil and wipe clean (for traditional non-stick)
Annually:
- Evaluate overall pan condition
- Consider replacement if coating shows significant wear
This maintenance approach has extended the life of my cookware collection significantly. My oldest pan, a Nova ceramic nonstick piece, is now in its fourth year and still performs beautifully.
When to Replace vs. Restore: Making the Right Decision
Not every burnt pan is worth saving. Understanding when restoration makes sense versus when replacement is necessary helps you make cost-effective decisions.
Signs Your Pan Can Be Restored ✅
- Coating appears intact with no visible peeling or flaking
- Burns are surface-level without deep pitting
- Pan base remains flat without warping
- Handle and rivets are secure
- Pan is less than 3-5 years old (typical non-stick lifespan)
Cost-benefit analysis: Spending 20-30 minutes cleaning a $40-80 pan makes economic sense. The cleaning supplies (baking soda, vinegar, dish soap) cost less than $2 total.
Signs Replacement Is Necessary ❌
- Coating is peeling, flaking, or chipping (health concern)
- Deep scratches expose underlying metal
- Pan is warped and doesn’t sit flat on burner
- Non-stick properties are gone even after thorough cleaning
- Discoloration is permanent and affects cooking performance
- Pan is 5+ years old with heavy use
Environmental consideration: While replacement seems wasteful, continuing to use damaged non-stick cookware may expose you to coating particles in food. Many communities now offer cookware recycling programs. Check your local waste management website for options.
When I replaced vs. restored: Last year, I had two burnt pans. One responded beautifully to the vinegar-baking soda method and continues to perform well. The other showed coating deterioration beyond the burn area, so I recycled it and invested in a quality replacement from my research on testing ceramic nonstick durability.
Professional Chef Secrets for Non-Stick Pan Care
During my research for this guide, I spoke with several professional chefs who shared their insider techniques for maintaining non-stick cookware in high-volume commercial kitchens.
The “Season After Cleaning” Technique
Professional kitchens often apply a thin protective layer after deep cleaning:
- After thoroughly cleaning and drying the pan, add 1/2 teaspoon of neutral oil
- Use a paper towel to spread it across the entire cooking surface
- Heat the pan on low for 2 minutes
- Remove from heat, let cool, then wipe away excess oil
- This creates a protective barrier and enhances non-stick properties
The “Deglaze and Clean” Method
Chefs often clean pans while they’re still warm (not hot) using a technique borrowed from sauce-making:
- After removing food, immediately add 1/4 cup water to the warm pan
- Use a wooden spoon to gently scrape any stuck bits
- The steam and heat help release particles
- Pour out the water and wipe clean with a soft cloth
- Wash normally once cooled
This prevents residue from hardening and makes cleaning significantly easier. I’ve adopted this practice and rarely deal with burnt-on food anymore.
Storage Practices That Prevent Damage
Pan protectors: Place soft cloth, paper towels, or commercial pan protectors between stacked cookware to prevent scratching.
Hanging storage: If possible, hang pans individually to eliminate contact damage entirely.
Proper stacking: Always place smaller pans inside larger ones, never the reverse, to distribute weight evenly.
The Cost of Cleaning vs. Replacing: A 2026 Analysis
Understanding the economics of cookware maintenance helps make informed decisions.
Cleaning Cost Breakdown
Per cleaning session:
- Baking soda (2 tablespoons): $0.15
- White vinegar (1 cup): $0.25
- Dish soap: $0.10
- Water and energy: $0.20
- Total: $0.70 per cleaning
Time investment: 15-30 minutes of active time, plus soaking
Replacement Costs (2026 Average Prices)
- Budget non-stick pan: $20-35
- Mid-range quality pan: $40-80
- Premium non-stick pan: $80-150
- Professional-grade pan: $150-300
Lifespan with proper care:
- Budget pans: 1-2 years
- Mid-range: 3-5 years
- Premium: 5-7 years
Annual cost comparison:
- Regular cleaning and maintenance: $8-12/year in supplies
- Budget pan replacement cycle: $15-35/year
- Mid-range pan replacement: $12-27/year
- Premium pan with care: $15-30/year
The math: Investing in a quality mid-range pan and maintaining it properly offers the best value. My simple bakeware cleanup tips have saved me hundreds of dollars over the past five years.
Environmental Impact: Why Proper Cleaning Matters
Beyond personal economics, cookware maintenance has significant environmental implications.
The Disposal Problem
Landfill concerns:
- Non-stick coatings contain synthetic polymers that don’t biodegrade
- Aluminum and steel pans can take 200-500 years to decompose
- PFAS-containing coatings (older pans) may leach into soil and groundwater
Annual cookware waste: Americans dispose of approximately 50 million non-stick pans annually, contributing roughly 75,000 tons of waste to landfills.
Manufacturing Carbon Footprint
Producing a single non-stick pan generates:
- Aluminum extraction and processing: 12-15 kg CO₂ equivalent
- Coating application: 3-5 kg CO₂ equivalent
- Transportation and packaging: 2-3 kg CO₂ equivalent
- Total: 17-23 kg CO₂ per pan
Impact of extension: Extending a pan’s life by just one year through proper cleaning and maintenance prevents approximately 17-23 kg of CO₂ emissions per pan.
Recycling Options in 2026
Many municipalities now accept cookware through specialized recycling programs:
- Scrap metal recycling: Accepts pans with removed handles
- TerraCycle programs: Some manufacturers offer take-back programs
- Donation options: Lightly used cookware can be donated to shelters, community kitchens
For those interested in broader eco-friendly cookware options, the market has expanded significantly with sustainable alternatives.
Comparing Cleaning Methods: Quick Reference Guide
| Method | Severity Level | Time Required | Cost | Effectiveness | Pan Safety |
|---|---|---|---|---|---|
| Warm Soapy Soak | Light burns | 30-60 min | $0.10 | ⭐⭐⭐ | ⭐⭐⭐⭐⭐ |
| Vinegar + Baking Soda | Heavy burns | 20-30 min | $0.40 | ⭐⭐⭐⭐⭐ | ⭐⭐⭐⭐⭐ |
| Baking Soda Paste | Moderate burns | 25-40 min | $0.20 | ⭐⭐⭐⭐ | ⭐⭐⭐⭐⭐ |
| Dish Soap Simmer | Moderate burns | 15-20 min | $0.15 | ⭐⭐⭐⭐ | ⭐⭐⭐⭐⭐ |
| Salt Scrub | Light-moderate | 10-15 min | $0.05 | ⭐⭐⭐ | ⭐⭐⭐⭐ |
| Dishwasher Tablet | Moderate burns | 15-20 min | $0.40 | ⭐⭐⭐⭐ | ⭐⭐⭐⭐ |
| Lemon + Baking Soda | Light burns | 20-25 min | $0.35 | ⭐⭐⭐ | ⭐⭐⭐⭐⭐ |
Frequently Asked Questions About Cleaning Burnt Non-Stick Pans
Can I use Bar Keeper’s Friend on non-stick pans?
No. Bar Keeper’s Friend contains oxalic acid and fine abrasives designed for stainless steel. While effective on stainless cookware, it’s too harsh for non-stick coatings and will cause damage. Stick with baking soda-based methods instead.
How do I remove the white film that appears after cleaning?
White residue typically indicates mineral deposits from hard water or remaining baking soda. Rinse the pan thoroughly with distilled white vinegar, then wash again with dish soap and rinse with clean water. Dry immediately to prevent new deposits.
Is it safe to use a burnt non-stick pan after cleaning?
If the coating remains intact (no peeling, flaking, or deep scratches), the Baking Pans is safe to use after proper cleaning. However, if the burning damaged the coating itself, replacement is recommended.
Can I clean burnt non-stick baking pans the same way?
Yes! The same methods work for burnt baking pans. The vinegar and baking soda method is particularly effective for sheet pans with baked-on residue.
How often should I deep clean my non-stick pans?
Even without visible burning, perform a baking soda paste treatment monthly to remove invisible buildup that accumulates from cooking oils and prevents optimal non-stick performance.

Conclusion: Mastering Non-Stick Pan Restoration
Learning How to Clean a Burnt Non Stick Pan effectively transforms what seems like a kitchen disaster into a manageable maintenance task.
The progressive approach, starting with gentle soaking and escalating to the powerful vinegar-baking soda method only when needed, protects your cookware investment while delivering professional-quality results.
The key principles to remember:
✅ Always avoid abrasive materials that permanently damage non-stick coatings
✅ Use the gentlest effective method to preserve pan longevity
✅ Prevention through proper technique eliminates most burning incidents
✅ Regular maintenance extends cookware life by 2-3 years
✅ Know when to restore vs. replace for safety and value
Your Next Steps:
- Assess your current situation: Examine your burnt pan for coating integrity
- Choose your method: Start with warm soapy soaking, escalate to vinegar-baking soda if needed
- Implement prevention: Adjust your cooking heat and preheating habits
- Establish maintenance routine: Monthly deep cleaning prevents future burning
- Invest wisely: When replacement becomes necessary, choose quality cookware designed for durability
The time you invest in proper cleaning and maintenance pays dividends in cookware longevity, cooking performance, and environmental responsibility.
My own experience restoring dozens of burnt pans over the years has taught me that most cookware disasters are completely reversible with the right approach.
Whether you’re dealing with a minor cooking mishap or serious carbonization, you now have the expert knowledge to restore your non-stick cookware to like-new condition.
Start with the method that matches your burn severity, and enjoy the satisfaction of salvaging cookware you thought was beyond repair.
2 responses to “How to Clean a Burnt Non Stick Pan: Safety Guide 2026”
[…] rinse hot pans under cold water. This thermal shock can warp the pan and crack the coating. Let pans cool naturally before washing—patience here adds months to […]
[…] Keeper’s Friend: For ceramic nonstick only, this gentle abrasive removes metal marking without damaging the […]