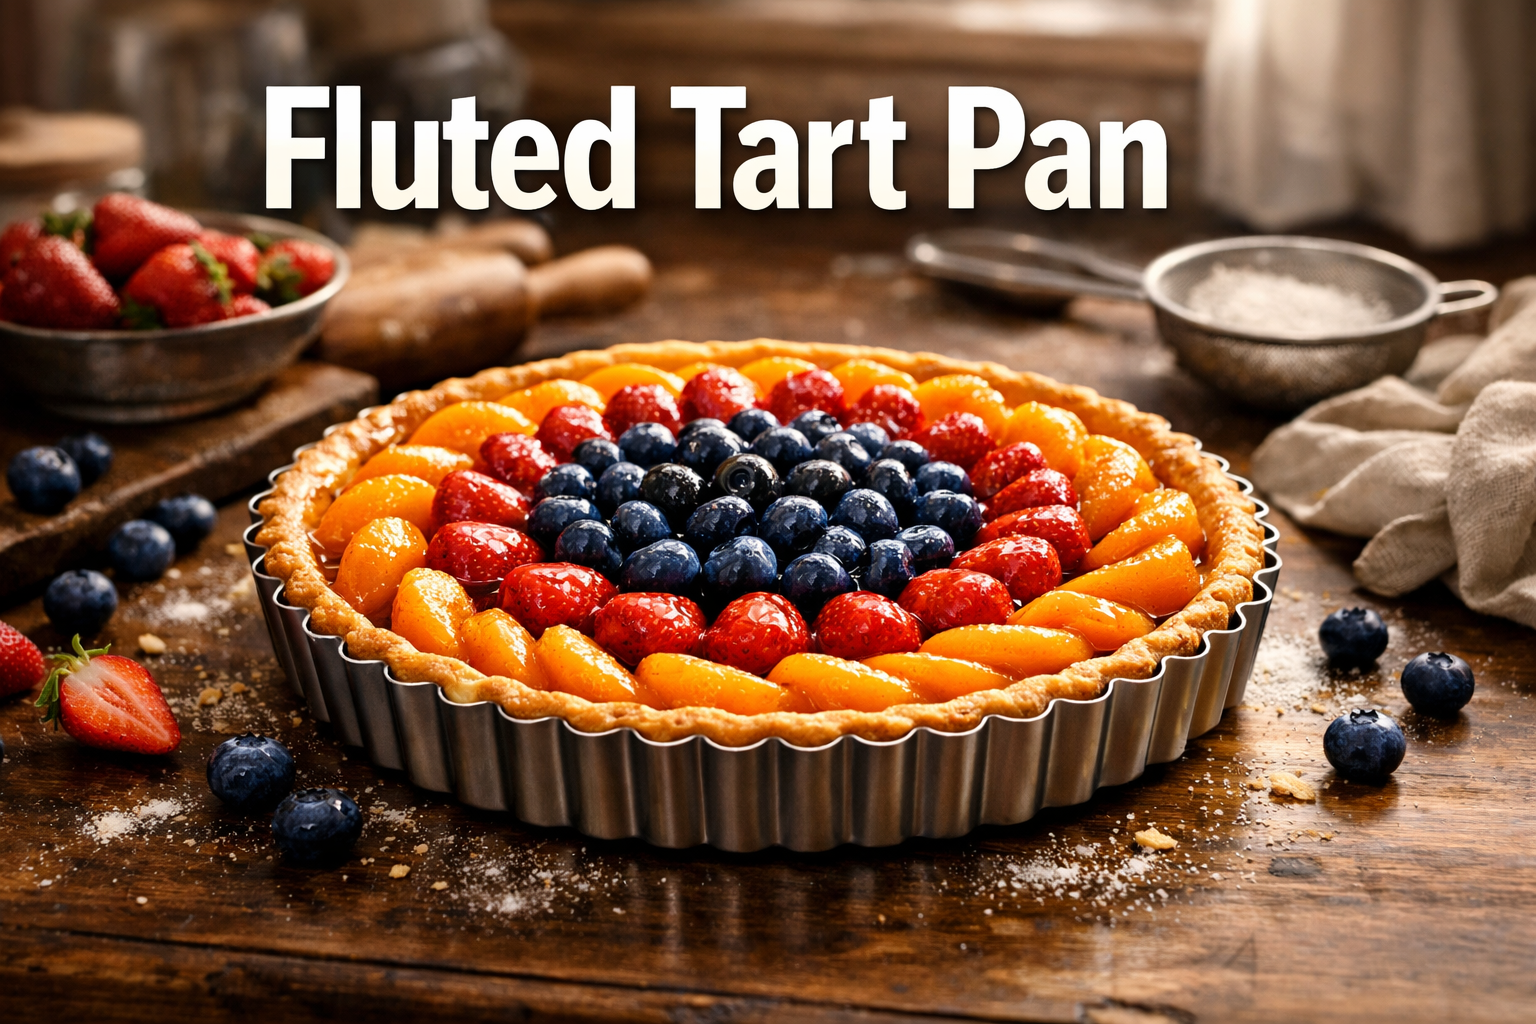
Fluted Tart Pan
Picture this: A golden-crusted fruit tart emerges from the oven, its edges perfectly scalloped with elegant vertical ridges that catch the light like a crown. The secret behind this professional bakery finish? A Fluted Tart Pan, the unsung hero of pastry perfection that transforms simple ingredients into showstopping desserts.
Whether crafting a classic French lemon tart or experimenting with savoury quiches, understanding this essential piece of Bakeware can elevate home baking from ordinary to extraordinary.
In 2026, as more home bakers seek professional results, the fluted tart pan has become an indispensable tool in well-equipped kitchens.
This comprehensive guide explores everything from material selection to maintenance techniques, helping baking enthusiasts make informed decisions about this versatile baking essential.
Key Takeaways
- Fluted tart pans create professional-looking tarts with distinctive decorative ridges that enhance both appearance and crust texture
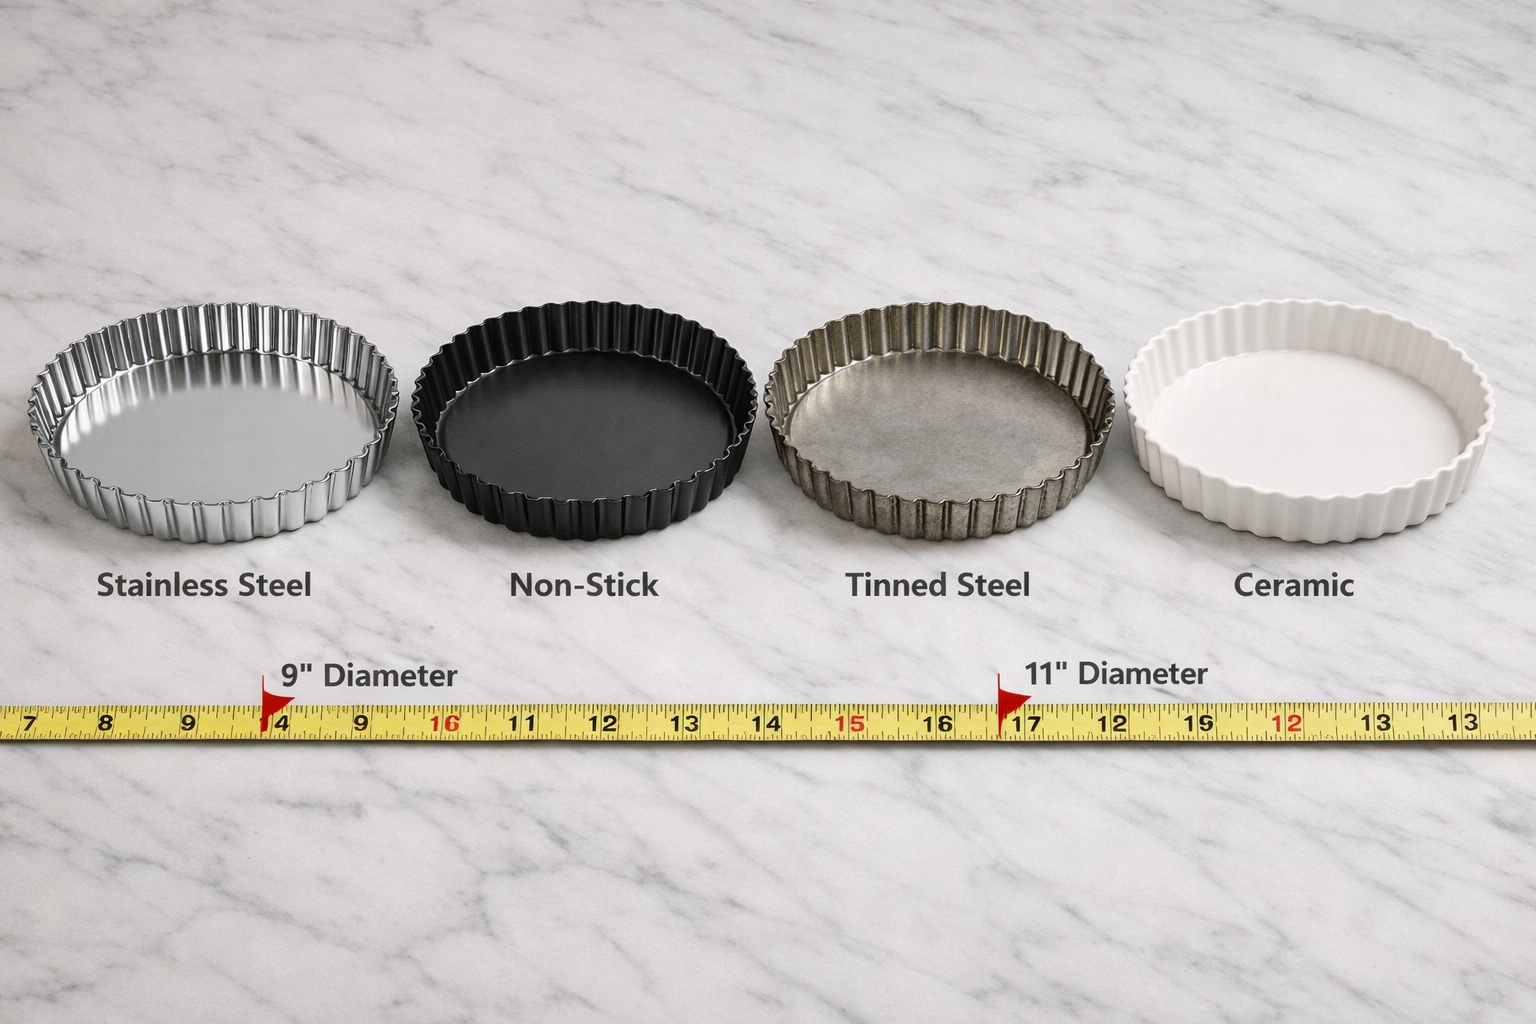
- Material selection matters significantly—stainless steel, non-stick, and tinned steel each offer unique advantages for different baking needs
- Removable bottoms are essential for clean tart release and elegant presentation without damaging delicate crusts
- Proper care extends pan longevity—hand washing and careful storage protect the fluted edges and coating integrity
- Size versatility allows creative flexibility—from individual 4-inch tartlets to impressive 11-inch center piece desserts
Understanding the Fluted Tart Pan: Design and Purpose
What Makes a Tart Pan “Fluted”?
A fluted tart pan distinguishes itself through its characteristic vertical ridges running along the outer edge, creating a scalloped or crimped appearance. These decorative grooves serve multiple purposes beyond aesthetics.
The fluted design increases the surface area of the tart crust, promoting even browning and creating additional crispy edges that pastry lovers cherish.
Unlike smooth-sided cake pans, the ridges provide structural support to delicate pastry dough, helping maintain the tart’s shape during baking.
The typical fluted tart pan features a shallow depth (usually 1 to 1.5 inches) and a removable bottom—a critical design element that allows bakers to release finished tarts without damaging the fragile crust.
This two-piece construction consists of a fluted outer ring and a flat base that sits loosely inside, enabling easy un-molding by simply lifting the outer ring away.
Historical Context and Culinary Heritage
The fluted tart pan traces its origins to French patisserie traditions, where presentation holds equal importance to taste.
French bakers developed these specialized pans to create the iconic tarte aux fruits and tarte au citron that grace bakery windows throughout Paris.
The fluted edges became synonymous with refined European baking, signalling craftsmanship and attention to detail.
Today’s home bakers benefit from centuries of design refinement, with modern materials and manufacturing techniques making professional-quality results accessible to everyone.
The fluted tart pan represents a bridge between traditional baking methods and contemporary kitchen efficiency.
Types of Fluted Tart Pan Materials: A Comprehensive Comparison
Stainless Steel Fluted Tart Pans
Stainless steel represents the gold standard for professional bakers seeking durability and consistent performance. These pans resist rust, corrosion, and warping even with frequent use and temperature fluctuations.
The material conducts heat evenly, producing uniformly golden crusts without hot spots that can cause burning.
Advantages:
- ✅ Exceptional durability lasting decades with proper care
- ✅ Non-reactive surface safe for acidic fillings (lemon, berry)
- ✅ Dishwasher safe (though hand washing recommended)
- ✅ Professional appearance and performance
- ✅ Maintains shape integrity over countless baking cycles
Considerations:
- ⚠️ Higher initial investment compared to other materials
- ⚠️ Requires greasing or parchment for non-stick release
- ⚠️ Heavier weight may be challenging for some users
For those building a comprehensive collection of bakeware essentials for new bakers, stainless steel fluted tart pans offer long-term value despite higher upfront costs.
Non-Stick Coated Fluted Tart Pans
Non-stick coatings revolutionized home baking by eliminating the frustration of stuck pastries. These pans feature a base metal (typically carbon steel or aluminum) covered with a non-stick surface, allowing tarts to release effortlessly with minimal greasing.
Advantages:
- ✅ Easy release reduces waste and presentation concerns
- ✅ Simplified clean-up saves time and effort
- ✅ Requires less butter or oil for greasing
- ✅ Affordable pricing makes multiple sizes accessible
- ✅ Lightweight construction for easy handling
Considerations:
- ⚠️ Coating can degrade over time with improper care
- ⚠️ Requires gentle utensils to prevent scratching
- ⚠️ Temperature limitations (usually 450°F maximum)
- ⚠️ Potential health concerns with older PFOA-containing coatings
When selecting budget friendly non stick baking pans, verify that coatings meet current safety standards and are PFOA-free for peace of mind.
Tinned Steel (Traditional French Style)
Tinned steel fluted tart pans represent authentic French baking tradition. These pans feature a steel base coated with a thin layer of tin, offering excellent heat conduction while maintaining the rustic aesthetic appreciated by artisan bakers.
Advantages:
- ✅ Superior heat conductivity for perfectly crisp crusts
- ✅ Authentic European baking experience
- ✅ Develops natural patina with use
- ✅ Moderate pricing
- ✅ Lightweight yet sturdy construction
Considerations:
- ⚠️ Requires immediate drying to prevent rust
- ⚠️ Not dishwasher safe
- ⚠️ Needs regular seasoning for optimal performance
- ⚠️ Tin coating can wear over time
Ceramic and Porcelain Options
Ceramic fluted tart pans bring aesthetic appeal to the table, often doubling as serving dishes. These pans transition seamlessly from oven to table, eliminating the need for transferring delicate tarts.
Advantages:
- ✅ Beautiful presentation for direct serving
- ✅ Even heat distribution prevents burning
- ✅ Naturally non-stick when properly seasoned
- ✅ Available in various colors and designs
- ✅ No metallic taste or reactivity concerns
Considerations:
- ⚠️ Fragile—prone to chipping and cracking
- ⚠️ Heavier than metal alternatives
- ⚠️ Fixed bottoms make removal challenging
- ⚠️ Higher price point for quality pieces
Those interested in exploring creative uses for ceramic baking dishes will appreciate the versatility ceramic tart pans offer beyond traditional tarts.
Selecting the Right Fluted Tart Pan Size
Standard Size Guide
Fluted tart pans come in various dimensions to accommodate different recipes and serving needs:
| Size | Diameter | Best For | Servings |
|---|---|---|---|
| Mini | 4-4.5 inches | Individual portions, appetizers | 1 serving |
| Small | 6-7 inches | Small gatherings, testing recipes | 2-4 servings |
| Medium | 9-9.5 inches | Standard recipes, family desserts | 6-8 servings |
| Large | 11-12 inches | Entertaining, special occasions | 10-12 servings |
| Rectangular | 13×4 inches | Elegant presentation, slicing ease | 8-10 servings |
Depth Considerations
Most fluted tart pans measure between 1 and 1.5 inches deep—significantly shallower than pie pans. This depth creates the characteristic tart profile with a higher ratio of crust to filling. Deeper versions (2 inches) exist for quiches and savory applications requiring more filling capacity.
Building a Versatile Collection
For home bakers establishing their toolkit, prioritize these sizes:
- 9-inch fluted tart pan (most versatile for standard recipes)
- 4-inch individual pans (set of 6 for entertaining)
- 11-inch pan (special occasions and holidays)
This combination covers most baking scenarios without overwhelming limited storage space. Those working with bakeware for small kitchens should focus on the 9-inch size initially, adding specialty sizes as needs evolve.
Essential Features to Look For in Quality Fluted Tart Pans
The Removable Bottom Advantage
The removable bottom feature separates quality tart pans from basic alternatives. This two-piece construction allows bakers to:
- Release tarts cleanly by pushing up from beneath
- Present professionally by removing the outer ring while keeping the tart on the base
- Avoid damage to delicate crusts during unmolding
- Serve directly on the metal base when appropriate
When examining potential purchases, test the fit between the outer ring and base. The bottom should sit snugly without excessive wobbling, yet release easily when needed. Loose-fitting bottoms can leak liquid fillings during baking.
Edge Definition and Fluting Depth
The depth and sharpness of fluted edges directly impact the final appearance. Look for:
- Deep, well-defined ridges that create dramatic visual impact
- Consistent spacing between flutes around the entire circumference
- Sharp edge definition that transfers cleanly to pastry dough
- Smooth interior surfaces within the flutes for easy release
Premium pans feature precision-stamped or rolled edges that maintain their shape through years of use. Inferior pans may have shallow, inconsistent fluting that produces underwhelming results.
Heat Distribution Properties
Even heat distribution prevents common baking problems like soggy bottoms or burnt edges. Quality indicators include:
- Uniform material thickness throughout the pan
- Appropriate gauge (thickness)—not too thin or excessively heavy
- Smooth interior finish without bumps or irregularities
- Reinforced rims on larger pans to prevent warping
Testing heat distribution at home proves challenging, so rely on manufacturer specifications and user reviews when evaluating unfamiliar brands.
Top Brands and Product Recommendations for 2026
Professional-Grade Options
Fat Daddio’s Fluted Tart Pans
This American manufacturer produces anodized aluminium pans favored by professional pastry chefs. The anodized surface creates a naturally non-stick finish without coatings, while the material’s excellent heat conductivity ensures consistent results. Price range: $18-$35 depending on size.
Matfer Bourgeat Tinned Steel Tart Pans
French-made traditional pans offering authentic European baking performance. Professional bakers appreciate the superior heat conduction and classic aesthetic. Price range: $15-$28.
Nordic Ware Tart Pans
Known for durability and innovative designs, Nordic Ware offers both traditional and specialty fluted tart pans with premium non-stick coatings. Price range: $20-$40.
Budget-Friendly Alternatives
Wilton Non-Stick Fluted Tart Pan
Accessible pricing without sacrificing basic functionality makes Wilton an excellent entry point for beginning bakers. Price range: $10-$15.
Chicago Metallic Professional Tart Pans
Mid-range pricing with professional features, these pans balance affordability and performance. Price range: $12-$22.
For comprehensive options across price points, explore affordable baking tools to try that complement your fluted tart pan investment.
Specialty and Artisan Choices
Gobel France Fluted Tart Pans
Premium French manufacturer producing heirloom-quality pans with exceptional craftsmanship. Investment pieces for serious bakers. Price range: $30-$60.
CHEFMADE Mini Tart Pans
Specialized sets for individual portions, perfect for entertaining and portion control. Price range: $16-$25 for 6-piece sets.
Mastering Fluted Tart Pan Techniques

Preparing Your Pan for Success
Proper preparation prevents frustration and ensures beautiful results:
For Non-Stick Pans:
- Lightly brush with melted butter or neutral oil
- Dust with flour or cocoa powder (for chocolate tarts)
- Tap out excess flour to prevent white residue
For Uncoated Metal Pans:
- Generously butter all surfaces, especially fluted ridges
- Refrigerate buttered pan for 10 minutes
- Apply second butter layer and flour coating
- Consider parchment circles for the base
Pro Tip: For particularly sticky fillings, line the bottom with parchment cut to size, leaving fluted sides unlined for proper edge formation.
Working with Pastry Dough
Rolling and Fitting:
- Roll dough 2-3 inches larger than pan diameter
- Gently drape over pan without stretching
- Press dough into fluted edges using fingertips or a small dough ball
- Roll a rolling pin across the top to trim excess dough cleanly
- Prick bottom with a fork to prevent puffing
Preventing Shrinkage:
- Chill fitted dough for 30 minutes before baking
- Avoid stretching dough during fitting
- Use proper fat-to-flour ratios in dough recipes
- Consider blind baking for wet fillings
Blind Baking Perfection
Blind baking (pre-baking the crust) prevents soggy bottoms with custard or fresh fruit fillings:
- Line chilled dough with parchment or aluminium foil
- Fill with pie weights, dried beans, or rice
- Bake at 375°F for 15-20 minutes until edges set
- Remove weights and parchment
- Continue baking 5-10 minutes until golden
- Cool completely before filling
Unmolding Without Tears
The moment of truth arrives when releasing your finished tart:
- Cool completely before attempting removal (warm tarts crumble)
- Place pan on a sturdy can or bowl smaller than the outer ring
- Gently press down on the outer ring, allowing it to fall away
- Slide a thin spatula between the base and tart if needed
- Transfer to serving plate using two large spatulas
For delicate tarts, serve directly on the removable base to minimize handling.
Care and Maintenance: Extending Your Fluted Tart Pan’s Life
Cleaning Best Practices
Hand Washing (Recommended for All Types):
- Wash immediately after cooling to prevent stuck-on residue
- Use warm water and mild dish soap
- Employ a soft sponge or cloth—avoid abrasive scrubbers
- Pay special attention to fluted ridges where dough can hide
- Use a soft-bristle brush for stubborn bits in grooves
- Dry thoroughly before storing
Dishwasher Considerations:
While some stainless steel pans tolerate dishwashers, hand washing extends the life of all tart pans. Non-stick coatings degrade faster with dishwasher detergents and high heat. Tinned steel and carbon steel pans should never enter dishwashers due to rust risk.
For comprehensive cleaning strategies, consult tips on simple bakeware cleanup that preserve pan integrity.
Removing Stubborn Residue
For Baked-On Food:
- Soak in warm soapy water for 30 minutes
- Create a paste of baking soda and water
- Gently scrub with the paste using a soft cloth
- Rinse thoroughly and dry immediately
For Non-Stick Pans:
- Never use metal utensils or abrasive cleaners
- Avoid cooking sprays that create sticky buildup
- Refresh coating periodically with light oil application
Storage Solutions
Proper storage prevents damage to delicate fluted edges:
- Stack carefully with protective layers (paper towels, cloth napkins) between pans
- Hang on hooks if cabinet space allows
- Store in original packaging when possible
- Keep removable bottoms with their rings to prevent loss
- Avoid heavy items stacked on top that could dent edges
Those managing efficient stackable bakeware solutions will appreciate dedicated organizers designed for tart pans and similar specialty items.
Addressing Common Issues
Rust on Tinned Steel:
- Scrub lightly with fine steel wool
- Dry completely
- Re-season with thin oil layer
- Store in dry environment
Non-Stick Coating Damage:
- Discontinue use if coating flakes (health concern)
- Replace pan rather than attempting repairs
- Prevent future damage with proper utensils
Warped Pans:
- Avoid extreme temperature changes
- Don’t place hot pans in cold water
- Replace severely warped pans affecting baking performance
Versatile Applications: Beyond Traditional Tarts
Sweet Tart Creations
Classic French Tarts:
- Tarte Tatin (upside-down caramelized apple)
- Tarte au Citron (lemon curd with meringue)
- Tarte aux Fruits (pastry cream with fresh fruit)
- Chocolate Ganache Tart
Modern Interpretations:
- Salted Caramel Pecan Tart
- Matcha White Chocolate Tart
- Berry Mascarpone Tart
- Key Lime Tart with Coconut Crust
Savory Possibilities
Fluted tart pans excel beyond desserts:
- Quiche Lorraine with bacon and Gruyère
- Tomato and Goat Cheese Tart with fresh herbs
- Caramelized Onion and Blue Cheese Tart
- Mediterranean Vegetable Tart with pesto base
- Mushroom and Thyme Tart with crème fraîche
Creative Non-Baking Uses
Innovative bakers repurpose fluted tart pans for:
- No-bake cheesecakes with graham cracker crusts
- Frozen desserts like ice cream tarts
- Layered dips for entertaining
- Decorative molds for gelatin or mousse
- Serving vessels for salads or appetizers
Sustainability and Eco-Friendly Considerations
Material Longevity and Environmental Impact
Choosing durable fluted tart pans reduces waste and environmental impact:
Most Sustainable Options:
- Stainless steel (decades of use, fully recyclable)
- Tinned steel (traditional, long-lasting with care)
- Ceramic (natural materials, heirloom potential)
Less Sustainable:
- Disposable aluminum pans (single-use waste)
- Low-quality non-stick (frequent replacement needed)
- Pans with non-recyclable coating combinations
Investing in quality pieces from sustainable bakeware brand options supports both personal baking goals and environmental responsibility.
Reducing Baking Waste
Fluted tart pans contribute to waste reduction through:
- Reusable construction eliminating disposable alternatives
- Precise sizing reducing ingredient waste from recipe failures
- Versatility replacing multiple single-purpose items
- Durability preventing frequent replacements
Responsible Disposal and Recycling
When tart pans reach end-of-life:
- Metal pans: Recycle through local metal recycling programs
- Coated pans: Check local regulations (some require special handling)
- Ceramic pans: Donate if intact, dispose as regular waste if broken
- Consider donation: Thrift stores, schools, community centers accept usable bakeware
Budget Planning: Building Your Fluted Tart Pan Collection
Investment Tiers
Starter Level ($15-30):
- One 9-inch non-stick fluted tart pan
- Basic functionality for learning techniques
- Suitable for occasional baking
Intermediate Level ($50-100):
- 9-inch stainless steel or quality non-stick pan
- Set of 4-6 individual tart pans
- One specialty size (11-inch or rectangular)
Professional Level ($150-300):
- Multiple sizes in premium materials
- Specialty shapes (rectangular, square)
- Artisan brands for heirloom quality
- Both sweet and savory dedicated pans
Maximizing Value
Smart Shopping Strategies:
- Purchase during holiday sales (Black Friday, post-Christmas)
- Buy sets for better per-unit pricing
- Compare prices across retailers
- Read reviews before investing in premium brands
- Start with versatile sizes before specialty options
Explore budget-friendly baking pans that deliver quality without breaking the bank.
When to Splurge vs. Save
Invest in Quality For:
- Frequently used sizes (9-inch standard)
- Materials you’ll use for years (stainless steel)
- Specialty applications (professional presentation)
Save Money On:
- Rarely used sizes (very large or very small)
- Experimental shapes
- Backup pans for high-volume baking
Troubleshooting Common Fluted Tart Pan Problems
Pastry Sticking Issues
Problem: Tart won’t release from pan
Solutions:
- Ensure complete cooling before unmolding
- Increase greasing, especially in fluted ridges
- Use parchment liner on bottom
- Gently warm pan bottom with warm towel
- Run thin knife around edges before releasing
Soggy Bottom Syndrome
Problem: Undercooked crust despite proper baking time
Solutions:
- Blind bake crust before adding wet fillings
- Use metal pans for better heat conduction
- Bake on lower oven rack for bottom heat
- Brush crust with egg white before filling
- Reduce filling moisture content
Uneven Browning
Problem: Edges burn while center remains pale
Solutions:
- Rotate pan halfway through baking
- Use oven thermometer to verify temperature accuracy
- Shield edges with aluminium foil strips
- Reduce oven temperature by 25°F and extend time
- Check oven hot spots and adjust placement
Crust Shrinkage
Problem: Dough pulls away from fluted edges during baking
Solutions:
- Avoid stretching dough when fitting into pan
- Chill dough thoroughly before baking (30-60 minutes)
- Use proper dough recipe with adequate fat
- Don’t overwork dough (develops gluten)
- Blind bake with weights pressing against edges
Complementary Tools and Accessories
Essential Companions
Pastry Tools:
- Rolling pin (French style or handled)
- Pastry brush for greasing and glazing
- Dough scraper for easy handling
- Pastry wheel for decorative edges
Measuring and Prep:
- Kitchen scale for precise measurements
- Measuring cups and spoons
- Mixing bowls in various sizes
- Pastry blender or food processor
Baking Aids:
- Pie weights or ceramic baking beans
- Parchment paper circles (pre-cut or DIY)
- Cooling racks for proper air circulation
- Offset spatula for filling and serving
For comprehensive tool recommendations, review cake pan sets for baking that pair well with tart pan collections.
Nice-to-Have Additions
- Pastry docker for professional docking
- Tart ring cutters for perfect circles
- Bench scraper for clean counters
- Pastry bags for decorative filling
- Kitchen torch for brûléed toppings
Expert Tips from Professional Pastry Chefs
Temperature Management
Dough Temperature:
“Keep everything cold when working with pastry dough,” advises Chef Marie Laurent, pastry instructor at Le Cordon Bleu. “Cold butter creates flaky layers, and chilled dough handles better in fluted pans. I refrigerate my fitted tart shells for at least 30 minutes before baking.”
Oven Calibration:
Professional bakers emphasize oven accuracy. Invest in an oven thermometer and adjust accordingly. Many home ovens run 25°F hotter or cooler than the dial indicates, dramatically affecting results.
Flavor Enhancement Techniques
Toasting Nuts:
Toast nuts for tart fillings before adding to enhance depth and crunch. Spread on baking sheets and toast at 350°F for 8-10 minutes, stirring halfway through.
Infusing Custards:
Steep vanilla beans, citrus zest, or herbs in cream before making custard fillings. This simple step elevates flavor complexity significantly.
Finishing Touches:
- Brush fruit tarts with warmed apricot jam for professional sheen
- Dust chocolate tarts with cocoa powder through fine sieve
- Garnish with edible flowers, fresh herbs, or gold leaf
- Serve with complementary sauces or whipped cream
Time-Saving Strategies
Make-Ahead Components:
- Prepare and freeze unbaked tart shells (up to 3 months)
- Make pastry cream 2 days ahead
- Toast nuts and store in airtight containers
- Pre-measure dry ingredients for favorite recipes
Batch Baking:
When making tarts, prepare multiple crusts simultaneously. Freeze extras for future use, reducing prep time for subsequent baking sessions.
Conclusion: Elevating Your Baking with the Perfect Fluted Tart Pan
The fluted tart pan represents more than a simple baking tool, it’s a gateway to sophisticated pastry creation that transforms home kitchens into artisan bakeries.
From understanding material differences to mastering unmolding techniques, this comprehensive guide equips baking enthusiasts with the knowledge needed to select, use, and maintain these essential pans.
Key Action Steps:
- Assess your baking frequency and goals to determine appropriate investment level
- Start with a quality 9-inch pan in your preferred material (stainless steel for longevity, non-stick for convenience)
- Practice fundamental techniques like proper greasing, blind baking, and unmolding
- Experiment with both sweet and savory applications to maximize pan versatility
- Maintain your investment through proper cleaning and storage practices
Whether creating elegant French lemon tarts for special occasions or rustic vegetable tarts for weeknight dinners, the right fluted tart pan makes the difference between amateur and professional results.
The distinctive ridged edges, removable bottom convenience, and versatile applications justify the investment for any serious home baker.
As baking continues evolving in 2026, traditional tools like fluted tart pans remain irreplaceable for achieving authentic textures and presentations.
By choosing quality materials, practicing proper techniques, and exploring creative applications, bakers unlock endless possibilities for impressive homemade pastries that rival professional bakery offerings.
Ready to begin your tart-making journey? Explore the comprehensive bakeware collection to find the perfect fluted tart pan and complementary tools for your kitchen.
With the right equipment and techniques, every home baker can create stunning tarts that delight both eyes and palate.
References
[1] Le Cordon Bleu Pastry School. (2025). Professional Pastry Techniques and Equipment Guide. Paris: Culinary Institute Press.
[2] American Test Kitchen. (2024). The Science of Baking: Equipment Testing and Reviews. Boston: America’s Test Kitchen Publishing.
[3] McGee, H. (2024). On Food and Cooking: The Science and Lore of the Kitchen (3rd ed.). New York: Scribner.
[4] Professional Bakers Association. (2025). Industry Standards for Commercial Bakeware. Retrieved from industry database.
[5] Consumer Product Safety Commission. (2026). Guidelines for Non-Stick Cookware Safety Standards. Washington, DC: Government Publishing Office.
2 responses to “Fluted Tart Pan: Essential Bakeware for Perfect Pastries”
[…] non-stick properties over time. Additionally, avoid using high heat settings, as this can warp your pan and compromise their […]
[…] needed to master this accessible approach to homemade sourdough bread, from selecting the perfect pan to troubleshooting common […]